


About the client certificate migration
As part of the Tucows Registry CA 2026 migration, registrars can now generate and manage new EPP client certificates through the Registrar Console, in addition to the existing Tucows Registry Portal.
This is separate from updating the trust store used to validate the Tucows Registry EPP server. For the server certificate migration, see Preparing Your EPP Trust Store for the Tucows Registry CA 2026 Migration.
Both changes are required: your trust store authenticates the Tucows Registry EPP server, while your EPP client certificate authenticates your registrar connection to Tucows Registry.
Accessing EPP Certificates
To manage EPP client certificates:
- Sign in to the Registrar Console for any Tucows Registry instance where your registrar has access.
- Click your name in the top-right corner of the console (next to Logout) to open your account menu, and select EPP Certificates.
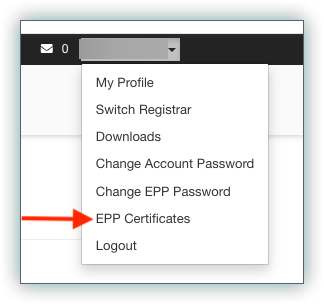
- Click Issue new certificate.
You do not need to generate a separate client certificate for each Tucows Registry instance. Generate the certificate through the Registrar Console for any Tucows Registry instance where your registrar has access. The same certificate can be used across your EPP connections to other Tucows Registry instances for the same registrar/client ID.
Production and OT&E certificates are separate. Generate one certificate for each environment you use.
Production: issue a new client certificate
For Production, you generate and retain your own private key. Only the Certificate Signing Request (CSR) is submitted to Tucows Registry.
Certificate requirements
- If using RSA, 4096 bits minimum.
- PKCS#10 PEM format.
- The CSR must begin with -----BEGIN CERTIFICATE REQUEST-----
- SHA-256 signature or stronger.
- Subject DN values in the CSR are replaced by Tucows Registry when the certificate is issued, so a placeholder CN is acceptable.
Important: Your private key is your authentication credential. Never send it to Tucows Registry. Store it securely and restrict access to it. If the key is lost or compromised, revoke the certificate immediately through EPP Certificates in the Registrar Console.
Submit the CSR
- Open EPP Certificates and click Issue new certificate.
- Confirm that the page shows the Production environment and the expected Tucows Registry-assigned CN.
- Choose Upload CSR to upload a .pem, .csr, or .txt file, or choose Paste CSR to paste the PEM-encoded CSR.
- Click Submit CSR.
Tucows Registry assigns the Subject DN when the certificate is issued. The CN is set to your Tucows Registry-assigned client ID regardless of the Subject DN in your CSR.
OT&E: issue a new client certificate
In OT&E, the Registrar Console can generate the key pair and certificate for you. You can also submit your own CSR if you prefer to manage your own private key.
Auto-generate a certificate
- Open EPP Certificates and click Issue new certificate.
- Confirm that the page shows the OT&E environment.
- Leave Auto-generate selected.
- Click Generate certificate.
If no CSR is provided, Tucows Registry generates an RSA 4096-bit key pair. The private key is returned with the issued certificate. In OT&E, it can also be downloaded again later from the certificate detail page.
Note: OT&E is the only environment where Tucows Registry holds a copy of a generated private key. Production never receives your private key.
Submit your own CSR in OT&E
To use your own private key in OT&E, select Upload CSR or Paste CSR instead of Auto-generate and submit the CSR in the same way as Production. The Subject DN is still assigned by Tucows Registry when the certificate is issued.
Downloading your certificate files
After issuance, the Certificate issued page provides the following downloads:
- Certificate PEM - the leaf client certificate.
- Full-chain bundle - the leaf certificate, the server CA chain, and the client CA. Use this if your software asks for a client certificate bundle.
- Server CA chain - server CA certificates only. Use this to verify the EPP server TLS certificate.
- Client CA - the CA that issued your client certificate. It is not normally required for EPP connectivity; include it in a trust store only if your software requires it for client certificate validation.
- Private key (OT&E only) - available when OT&E auto-generates the key pair.
Production private keys are never available for download from the Registrar Console. Use the private key that you generated when creating the Production CSR.
Examples
Production CSR examples
Linux / macOS
# Step 1 - Generate a 4096-bit RSA private key
openssl genrsa -out my-registrar.key 4096

# Step 2 - Generate the CSR
openssl req -new -sha256 \
  -key my-registrar.key \
  -out my-registrar.csr \
  -subj "/CN=placeholder"

# Step 3 - Verify (Public-Key should show 4096 bit)
openssl req -in my-registrar.csr -noout -text \
  | grep -E "Public-Key|Signature Algorithm"
Restrict key file permissions:
chmod 600 my-registrar.key
Windows - OpenSSL (Git Bash / PowerShell)
Install OpenSSL using Git for Windows, Chocolatey (choco install openssl), or a standalone installer, then use the same commands as Linux / macOS:
openssl genrsa -out my-registrar.key 4096

openssl req -new -sha256 \
  -key my-registrar.key \
  -out my-registrar.csr \
  -subj "/CN=placeholder"
Windows - certreq (no OpenSSL required)
Create a file named request.inf:
[Version]
Signature="$Windows NT$"

[NewRequest]
Subject="CN=placeholder, O=Your Org, C=US"
KeyLength=4096
KeySpec=1
Exportable=TRUE
RequestType=PKCS10
HashAlgorithm=SHA256
ProviderName="Microsoft RSA SChannel Cryptographic Provider"
ProviderType=12
Then run in Command Prompt as Administrator:
certreq -new request.inf my-registrar.csr
The private key associated with the CSR is stored in the Windows Certificate Store. After Tucows Registry issues the certificate, install the issued certificate so that Windows associates it with the existing private key. You can then export the certificate and private key together as a PKCS#12 (.pfx) file using Certificate Manager.
Troubleshooting common CSR errors
- RSA key size below 4096 bits - Generate a new key: openssl genrsa -out my-registrar.key 4096
- Invalid CSR signature - The CSR may be truncated or corrupted. Regenerate it from the same private key.
- CSR does not begin with -----BEGIN CERTIFICATE REQUEST----- - Check that you uploaded the CSR rather than the private-key file.
- Verify step shows (2048 bit) - Generate a fresh 4096-bit key and CSR.
Working with your issued certificate
Verify the issued certificate
openssl x509 -in my-registrar.pem -noout -text \
  | grep -E "Subject:|Issuer:|Not After|Public-Key"
Expected output should show:
- Issuer contains Tucows Registry Production Root CA 2026, or Tucows Registry OT&E Root CA 2026 in OT&E.
- Subject CN matches your Tucows Registry-assigned client ID.
- Public-Key shows (4096 bit) for an RSA certificate generated using the examples above.
Convert the certificate to PKCS#7
Some EPP clients and Java environments require PKCS#7 format (.p7b). PKCS#7 contains the certificate only; it does not contain the private key.
openssl crl2pkcs7 -nocrl \
  -certfile my-registrar.pem \
  -out my-registrar.p7b
Verify the result:
openssl pkcs7 -in my-registrar.p7b \
  -noout -print_certs -text \
  | grep -E "Subject:|Issuer:|Public-Key"
Create a PKCS#12 bundle
PKCS#12 (.p12 / .pfx) bundles the certificate and private key into a single file. Some Java keystores and Windows tools require this format.
openssl pkcs12 -export \
  -inkey my-registrar.key \
  -in    my-registrar.pem \
  -out   my-registrar.p12
OpenSSL prompts you to set a passphrase. Protect the resulting file with the same care as your private key.
Verify that the certificate matches the private key
Both commands should produce identical MD5 hashes if the certificate and key are a matched pair:
openssl x509 -in my-registrar.pem -noout -modulus | openssl md5
openssl rsa  -in my-registrar.key -noout -modulus | openssl md5
Revoking a certificate
You can revoke an EPP client certificate directly from the Registrar Console if your account has permission to manage EPP certificates.
- Open EPP Certificates.
- Locate the certificate you want to revoke and select Revoke, or open the certificate and click Revoke certificate.
- Select a revocation reason and add optional details if needed.
- Confirm the revocation.
Important: Revocation is permanent. Revoke a certificate if its private key is lost or compromised, or when the certificate should no longer be used.
If you cannot see or revoke the certificate in the Registrar Console, contact Tucows Registry Support.
Next steps
- Issue and download a new client certificate for every Tucows Registry environment you use.
- Configure your EPP client with the new certificate and its matching private key.
- Test that you can establish and authenticate an EPP session using the new client certificate.
- If you use both OT&E and Production, complete the process separately in each environment.
- Keep your existing working client certificate available until you have confirmed the new certificate works and Tucows Registry has communicated that legacy client certificates can be retired.
Support
Questions or problems issuing a certificate? Contact Tucows Registry Support and reference the Tucows Registry CA 2026 EPP client certificate migration.
Was this article helpful? If not please submit a request here
How helpful was this article?
Thanks for your feedback!